马上注册成为YANBONG会员吧!
时下最热门的资讯、娱乐、贴图等分享都在这里等你发掘哦!
您需要 登录 才可以下载或查看,没有账号?注册
×
安装教学
----------------------------------------------------------------------------
準备档案 :
1.winamp 5 (听mp3程式)
2.Shoutcast dsp plug-in for winamp (winamp 插件 用途係设定电台 , 将声音encode)
3.SHOUTcast WIN32 Server(电台伺服器程式 , 让网友连结到你的网上电台)
按这下载
http://www.yourfilehost.com/media.php?cat=other&file=Winamp.rar
---------------------------------------------------------------------------
winamp 5 安装教学
1. 安装时所有选项只需选择预设值 , 不断选择"next"便可以

2. 安装进行中 , 直到完成

---------------------------------------------------------------------------
Shoutcast dsp plug-in for winamp 安装教学
1. 安装时所有选项只需选择预设值 , 不断选择"next"便可以

2. 安装完成

---------------------------------------------------------------------------
SHOUTcast WIN32 Server 安装教学
1. 安装时所有选项只需选择预设值 , 不断选择"next"便可以

2. 安装进行中 , 直到完成

---------------------------------------------------------------------------
在开始前有几点是必须注意的。你的port forward开了没有,如果开了就往下看,没有就看listen2myradio的那篇。
---------------------------------------------------------------------------
Shoutcast Server设定
1.在这裡我们先作SHOUTcast DNAS(下称为Server)的设定 ,
先在windows左下角 "开始" > programs > SHOUTcast DNAS
开啟SHOUTcast DNAS (GUI)

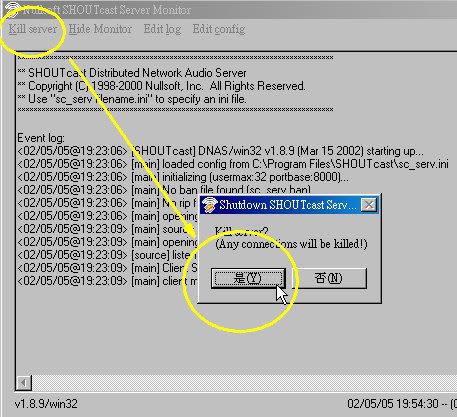
2. 开啟server之后 , 先选择 " edit config "(如下图)

3. 选择 " edit config "之后 , 便会出现一个文字档
最主要修改三个地方(见下图)
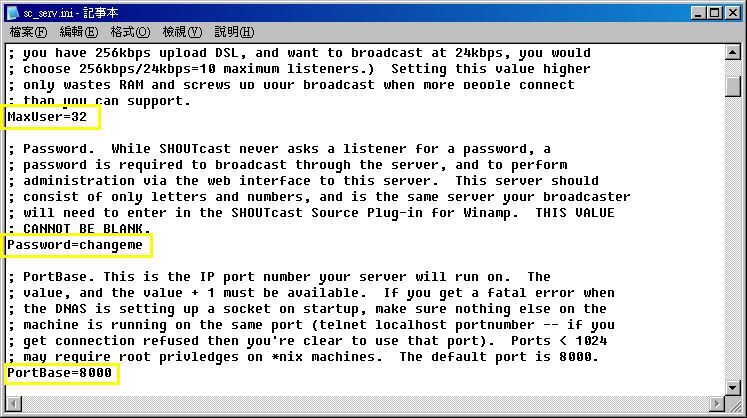
max user = 32
最大连线人数 , 视乎使用那一间网络供应商(ISP) , 因为不同的ISP会有不同既上传速度
假设你设定做 24 kpbs 做广播 , streamyx的用户最多可设定在8至10个用户
如果设定过多用户连接 , 用户端(听眾)会出现声音不畅顺情况 间歇性会听不到声音
----------------------------------------------
Password = changeme
login web base admin既密码 , 亦必须与 shoutcast plug in 相同
----------------------------------------------
portbase = 8000
听眾连接伺服器的埠号 , 使用预设值 8000 就可以
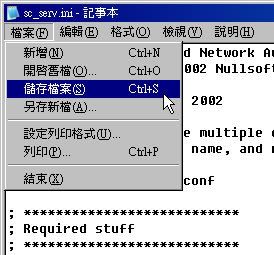
4. 切定完成后必须储存及按" kill server "重新啟动 Shoutcast Server , 设定才会生效
---------------------------------------------------------------------------
Shoutcast DSP Plug-in 设定
1.首先要打开 DSP Plug-in的设定介面 在winamp上右click > options > preferences

2. 进入了winamp preferences 选 dsp effect > nullsoft shoutcast source dsp v1.9.0
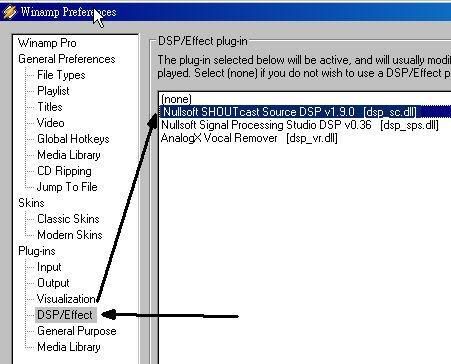
3. 当选择nullsoft shoutcast source dsp v1.9.0后便可进入到DSP Plug-in的设定介面(见下图)
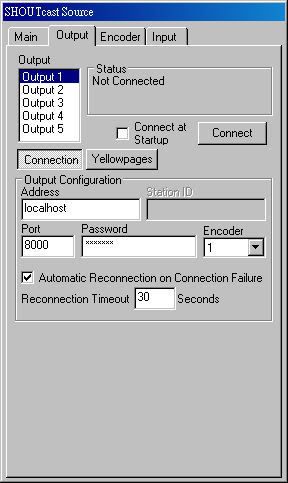
Connect制 : 开始encode
此页的大部份选项只需用预设值便可
Address : 预设值
Port : 8000 (预设值係 8000 , 此栏必须与Shoutcast Server上 portbase 一栏的设定值一样)
Password : changeme (预设值係 changeme , 此栏必须与Shoutcast Server上 Password 一栏的设定值一样)
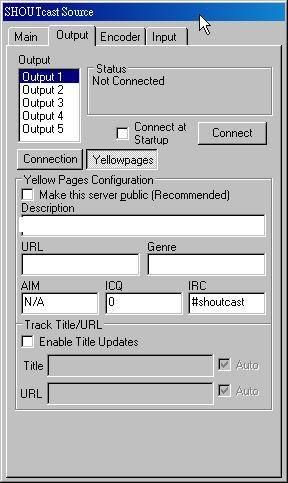
按 Yellowpages 后 会见到以下画面
在这裡可以打入电台名称 , 你既 icq number....等等资料
4. 切换到 Encoder 一页
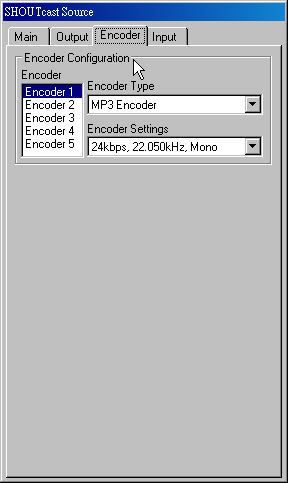
Encoder Settings 此选项可选择电台的声音质素
大部份用者都会选择24kbps , 22050kHz , Mono就已经足够
5.最后去到 Input 一页 , 这页主要设定声音的来源
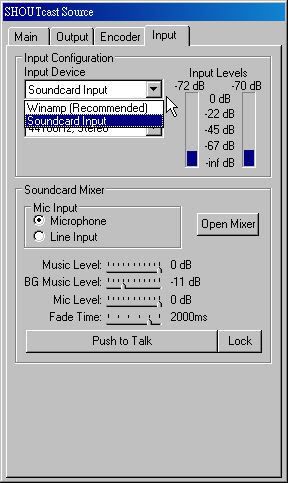
在这裡你会见到input device 有两个选项 ,
如果播歌的时候选择 " winamp(recommended)"
如果想开mic出声的话选择 "soundcard input "
(有些soundcard是不需要按lock和push来说话的。自己试试)
电台啟播及收听电台的方法
电台啟播
当所有经过程式的安装及设定后 , 便可以开始电台的播放
1.首先啟动SHOUTcast WIN32 Server

2. 接著啟动winamp with SHOUTcast DSP Plug-In
开啟后便按connect制(黄圈)开始电台广播

(如果不想每次都按connect就把connect at startup打钩)
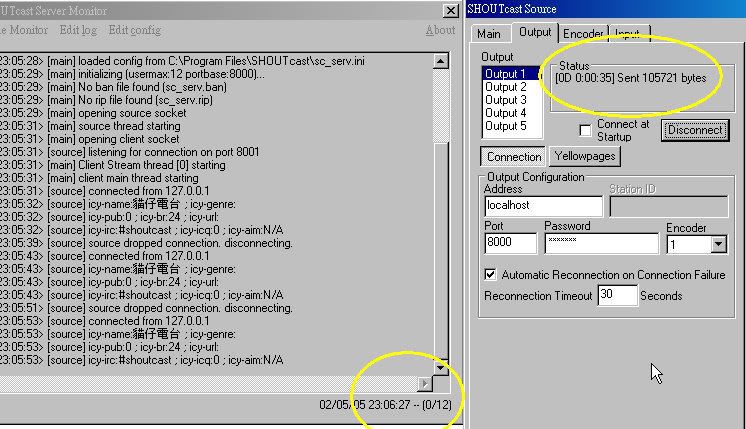
3. 按connect之后你会见到status一栏会有个时间出现
此时你的电台便成功开始广播了
|